
Add a place to keep your chuck key and throw in some safety for good measure!
Turning on a lathe with the key in the chuck is a easy way to get a trip to the hospital. A flying key can easily put a hole in your wall or break your nose. Every time I turn on the lathe, I'm reminded of working in the ASU machine shop on my capstone project and the machine shop lead pointing to a hole in the wall above the door leading to the shop: “See that hole? Someone left the key in the chuck. Not only did it put a hole in the wall, but someone was walking through the door at the time. It could have hit them in the face. Don't ever take your hand off the key while it's in the chuck.”
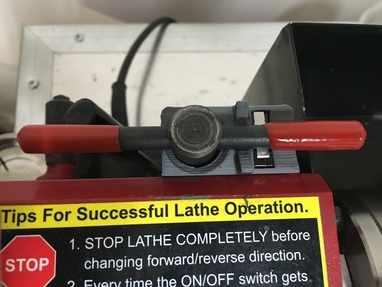
It's no surprise, then, that the first tool I purchased for the lathe was a self-ejecting key (a chuck key with a spring around the shaft to force it out of the chuck when you let go of it). This key is great, but I still needed a place to keep it. Being a proponent of lean manufacturing, I have to have a place to keep the key so I always know where it is. I kept it resting across the housing of the lathe and the end of the chuck shield hardware (the chuck shield was the first thing to be removed from the lathe, since the chuck key ejects automatically).
The standard chuck shield safety switch included with most mini lathes uses a microswitch with a small pin and an indented disk to operate. This circuit is required for the lathe to turn on. The controller board verifies that there is voltage across pins 6 and 7 on the board. The microswitch is wired as normally closed, so that when the pin is not activating the switch, the circuit is completed. If that circuit is open, the lathe will not turn on.
My original intention was to remove the chuck shield hardware altogether, but, as mentioned before, a closed circuit condition is required for the lathe to run. I could have simply shorted (jumped) the pins to make it work, but why not put that switch to good use? Even if I can't leave the key in the chuck, I can still use the switch to ensure the key is always put back where it belongs, therefore giving the key a standard place to live. I also wanted to use only hardware that came from the removal of the chuck safety shield to keep costs to a minimum. This allows for the reuse of the wires, switch and screws. This also means that I can reuse the original mounting location.
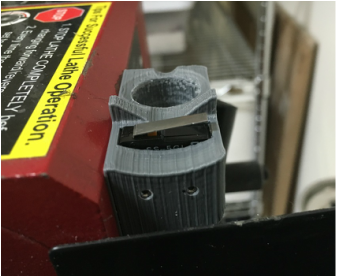
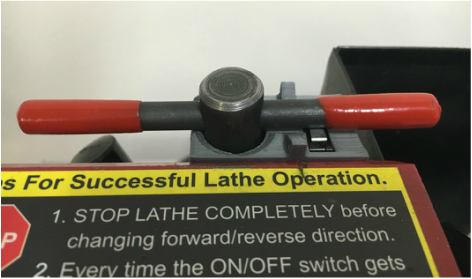
The result was a small plastic block that mounts to the back of the lathe housing. There is a large through hole which holds the key. It has a chamfered lead in on each end to help get the key out of the holder without getting hung up. The microswitch sits in a pocket next to the shaft of the key; it is activated by the handle of the key as it sits in the holder. The holder is secured to the lathe housing using the two removed screws into the same mounting location. The wires exit the housing in the same direction and location as the original safety switch.
The whole system works great. The chuck key reliably engages the switch when dropped into the holder, thanks to the two chamfered lead-ins. The key doesn't get hung up in the holder when putting it in or removing it. Plus, the switch in the housing means the key is always put back where it belongs!
Want to add this upgrade project to your mini lathe? We've got you covered: You can get the .stl file here for free (scroll down for the downloadable file) and 3D print it if you own a printer, you can have it printed by the 3D printing service of your choice, or you can purchase the printed holder from our site. Full installation instructions with pictures are included below (keep scrolling for a downloadable pdf).
NOTE: These instructions are provided for informational purposes only. As such, we hold no liability if you should injure yourself/others or damage your equipment. The provided files are for personal use only and thus are not for commercial use without the express written consent of Phenom Engineering, LLC.
Installation Instructions:
Download a copy:
| chuck_safety_switch_instructions.pdf |
 RSS Feed